A document set allows an organization to collect
related documents and group them together. When grouping the related
documents together, they can be treated as one when it comes to
metadata, workflow, versioning, and compliance.
For example, a document set for obtaining a mortgage
loan can consist of the following forms — credit application, asset
list, employment history, deed, and sales contract.
When buying a house, there are many forms to be
filled out. They are methodically handled by several different parties —
the bank, the seller, the real estate company, and so on. It all starts
with a mortgage application. The application is submitted and a
workflow kicks off for each item such as getting a credit report,
appraisal on the property, employment verification, among other things.
Once the individual workflows come back with
information, the application is then submitted to another party, which
must approve the loan. Each workflow item is kicked off independently,
but together they contribute to the final answer, which is whether or
not the mortgage is approved for the potential buyer.
Once the mortgage is approved, there is a deed issued
and sent to a title company and a payment plan is set up. This process
is comprised of many forms and parties, and your ability to get the
final approval is contingent upon each step being completed properly.
This recipe will show how to set up a document set for the mortgage process.&;
Getting ready
We first need to enable the Document Set Site Collection Feature.
Set up the following content types and group them under the type Mortgage:
AssetListCT&; — parent content type of Item
CreditApplicationCT&; — parent content type of Document
SalesContractCT&; — parent content type of Document
How to do it...
Navigate to a site with the team site template implemented.
Click on the dropdown next to Site Actions, and then click Site Settings.
Under the category named Galleries, click Site content types.
Click Create. The following form appears:
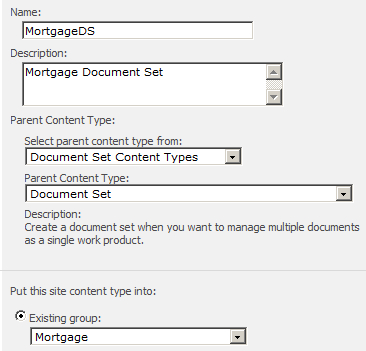
Fill in the form as shown in previous screenshot and then click OK.
Click Document Set Settings.
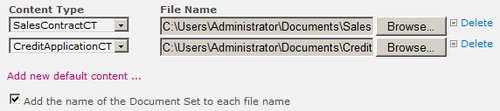
Under the Allowed Content Types section, choose Mortgage from the drop-down list. Select CreditApplicationCT and SalesContractCT from under the Content Type dropdown.
In Default Content, choose each content type selected in step 7 and add an associated document for each. Check the Add the name of the Document Set to each file name box. Your screen should look like the following screenshot:&;
Under Shared Columns, check the boxes for Description and Managed Keywords.
Add Managed Keywords to the Welcome Page Columns.
Do not customize the Welcome page.
Leave the Update all content types inheriting from this type option to Yes. Click OK.
Create a document library called Mortgage.
The ribbon lights up. At the far end, click Library Settings.
Set the Allow management of content types option to Yes. Click OK.
In the Content Types section, click Add from existing site content types.
Add the MortgageDS content type, and click OK.
Navigate back to the Mortgage document library. Click Documents under Library Tools.&;
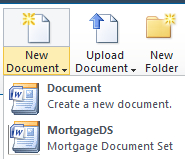
Click the drop-down list next to New Document and select MortgageDS.
An entry form appears. Fill in the Name, Description, and Managed Keywords fields. Click Save.
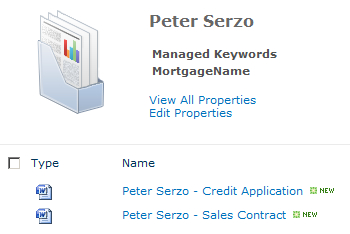
The following landing page appears with the necessary documents:
How it works...
Steps 1 to 5 show the process of creating a document set and giving it a name. Document Set is a content type. In our example, MortageDS inherits from this content type.
In steps 6 to 13, content types are assigned to be
part of the document set. Also, documents are associated with their
content types in step 8. In step 9, columns are included in the welcome
page. These columns can be shared across the document in the document
set itself. For instance, we could have added Mortgage Company as a
column and had it applied to each document in the set.
This recipe did not set up any custom columns. Also, this recipe did not customize the welcome page.&;
The last part of the recipe is creating the document
library, enabling management of content types, and then assigning the
Mortgage document set to the library. When a new document set is
created, all the associated documents with their content types are
shown.
A loan processor could now go through and process all the necessary paper work without missing a mandatory form.
There's more...
Workflows can be created with SharePoint Designer and
applied to the entire document set. Keeping in mind our Mortgage loan
example, a workflow could be set up to send information to the title
company and get information from the credit bureau. The application
could then be sent to the bank after the credit bureau sends their
information.
In addition, permission levels can be set on the
individual documents. Finally, retention policies can be added to the
document set.
More info
Document sets are built upon the content type SPFolder.